First Time Setup

After assembling your Ryzer hardware, this guide will walk you through the initial software setup to get online and access the web interface.

What Happens on First Boot

When you power up Ryzer for the first time (or after a reset):

  1. LEDs turn WHITE - This indicates Access Point mode
  2. Ryzer creates a WiFi network named “Ryzer”
  3. WiFi Manager starts - A captive portal for easy configuration
  4. Waits for your WiFi settings - You provide your network credentials

This whole process is automatic - no coding or flashing required!

Step 1: Power Up Ryzer

  1. Connect hardware (if you haven’t already):

    • Plug USB-C cable into Ryzer board
    • Connect other end to computer or USB power adapter
    • Turn on LED strip power supply
  2. Observe LED status:

    • LEDs should turn WHITE within 5-10 seconds
    • This means Ryzer is ready for configuration

โš ๏ธ If LEDs don’t turn white: Check Troubleshooting - Connection Issues

Step 2: Connect to Ryzer WiFi Network

On Your Computer (Windows/Mac/Linux)

  1. Open your WiFi settings
  2. Look for a network named “Ryzer”
  3. Click to connect
  4. No password required - it’s an open network

On Your Phone (iOS/Android)

  1. Go to Settings โ†’ WiFi
  2. Find network named “Ryzer”
  3. Tap to connect
  4. Temporarily disable mobile data (important!)

๐Ÿ’ก Tip: Disable mobile data on your phone to prevent it from automatically switching away from the Ryzer network.

๐Ÿ“ธ Screenshot Needed: WiFi list showing “Ryzer” network available

Step 3: Access WiFi Configuration Portal

Automatic Portal (Captive Portal)

For most devices, a configuration page should open automatically within a few seconds of connecting.

If the portal opens automatically:

  • You’ll see the WiFiManager interface
  • Skip to Step 4

Manual Access

If the portal doesn’t open automatically:

  1. Open a web browser
  2. Navigate to: http://192.168.4.1
  3. You should see the WiFiManager configuration page

๐Ÿ“ธ Screenshot Needed: WiFiManager main page with “Configure WiFi” button

Portal Not Opening?

Try these solutions:

  1. Disable automatic network switching:

    • On iPhone: Settings โ†’ WiFi โ†’ Turn off “Auto-Join Hotspot”
    • On Android: Disable “Switch to mobile data automatically”
  2. Turn off mobile data (smartphones)

  3. Manually browse to http://192.168.4.1

  4. Try a different device (sometimes tablets work better than phones)

  5. Use a computer instead of phone (most reliable)

Step 4: Configure Your WiFi Network

Once you’re on the WiFiManager page:

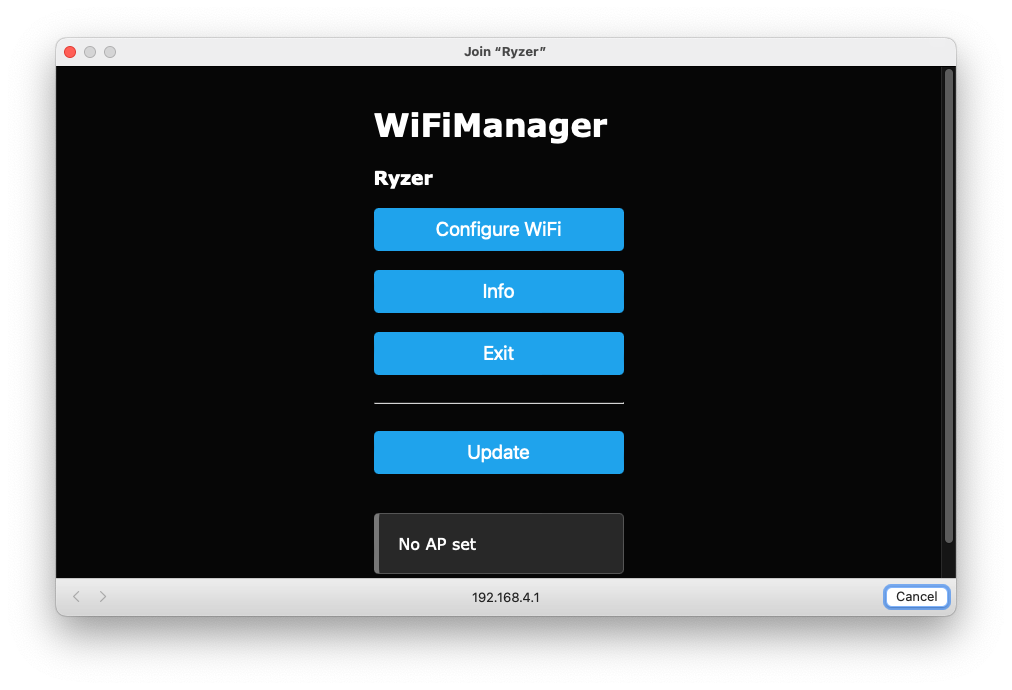
  1. Click “Configure WiFi” button

  2. Wait for network scan (5-10 seconds):

    • Ryzer will scan for available WiFi networks
    • Networks appear sorted by signal strength
  3. Select your home network:

    • Click on your WiFi network name (SSID)
    • The name should auto-fill in the form
  4. Enter your WiFi password:

    • Type your network password carefully
    • Click the “eye” icon to verify you typed it correctly
    • Case-sensitive - watch for caps lock!
  5. Optional settings (usually not needed):

    • SSID: Pre-filled with network you selected
    • Password: Your WiFi password
    • Leave other fields default
  6. Click “Save” button

๐Ÿ“ธ Screenshot Needed: WiFiManager showing network list and configuration form

Step 5: Wait for Connection

After clicking Save:

  1. Ryzer attempts to connect:

    • LEDs change from WHITE to LIGHT BLUE
    • This means “connecting to WiFi”
  2. Connection takes 10-30 seconds:

    • Be patient, don’t interrupt the process
    • Don’t disconnect power
  3. Success indicators:

    • LEDs turn BLACK (normal operation mode)
    • Ryzer WiFi network disappears
    • Your device reconnects to your home WiFi
  4. If connection fails:

    • LEDs stay WHITE or turn YELLOW
    • Ryzer WiFi network reappears
    • Try again with correct password

๐Ÿ’ก Common Mistake: Typo in WiFi password. Double-check caps lock and special characters!

Step 6: Find Your Ryzer’s IP Address

Now that Ryzer is connected to your network, you need to find its address:

Method 1: Use mDNS Address (Easiest)

Just try: http://ryzer.local

  • Works on Mac, Linux, and most Windows 10/11 systems
  • No need to find IP address
  • Easiest method if it works for you

โš ๏ธ Some networks don’t support mDNS (.local addresses). If ryzer.local doesn’t work, use Method 2.

Method 2: Check Your Router

  1. Log into your router (usually at 192.168.1.1 or 192.168.0.1)
  2. Find “Connected Devices” or “DHCP Clients” section
  3. Look for device named “ryzer” or “ESP32”
  4. Note the IP address (example: 10.0.0.123)

๐Ÿ“ธ Screenshot Needed: Router interface showing connected devices with Ryzer highlighted

Method 3: Use Serial Monitor (Advanced)

If you have Ryzer still connected via USB:

  1. Open PlatformIO or Arduino Serial Monitor
  2. Set baud rate to 115200
  3. Ryzer logs its IP address on boot
  4. Look for line like: IP address: 10.0.0.123

Method 4: Use Network Scanner App

Use apps like:

  • Fing (iOS/Android/Desktop)
  • Angry IP Scanner (Desktop)
  • Network Scanner (Android)

Look for device named “Espressif” or “ESP32”

Step 7: Access the Web Interface

  1. Open a web browser on any device connected to your network

  2. Navigate to Ryzer:

    • Try: http://ryzer.local
    • OR use IP address: http://10.0.0.123 (your address)
  3. You should see the Ryzer interface!

The interface has four main pages:

  • Connection - Configure MQTT connection to printer
  • Firmware - Check version and update firmware
  • Lighting - Configure LED settings
  • Troubleshooting - Diagnostics and reset options

๐Ÿ“ธ Screenshot Needed: Ryzer web interface homepage showing all four sections

Troubleshooting First Time Setup

Can’t Find “Ryzer” WiFi Network

Solutions:

  1. Wait 30 seconds after power-up for network to appear
  2. Power cycle Ryzer (unplug USB-C, wait 5 seconds, plug back in)
  3. Move closer to Ryzer (WiFi range is limited)
  4. Check if LEDs are WHITE (if not, Ryzer might already be configured)
  5. Reset WiFi settings

Portal Opened But Can’t Save Settings

Solutions:

  1. Check that password is correct (case-sensitive!)
  2. Ensure your WiFi network is 2.4GHz (Ryzer doesn’t support 5GHz)
  3. Check that WiFi network uses WPA2 security (WEP/WPA3 not supported)
  4. Try a network with simpler password (no special characters)

Ryzer Won’t Connect to My Network

Check these requirements:

RequirementDetails
Frequency2.4GHz only (5GHz not supported)
SecurityWPA2 (WPA/WEP/WPA3 not supported)
Network TypeStandard WiFi (enterprise WPA2-EAP not supported)
SSIDMust be broadcast (hidden networks not supported)
PasswordMax 63 characters

Can’t Access ryzer.local

Solutions:

  1. Try IP address instead: Check router for Ryzer’s IP
  2. Different browser: Try Chrome, Firefox, or Safari
  3. Different device: Try phone instead of computer
  4. Check network: Ensure your device is on same WiFi network
  5. Flush DNS:
    • Windows: ipconfig /flushdns
    • Mac: sudo dscacheutil -flushcache
    • Linux: sudo systemd-resolve --flush-caches

LEDs Stay White After Saving

This means connection failed. Common causes:

  • Wrong password (most common!)
  • 5GHz network selected (use 2.4GHz)
  • Network out of range
  • Router blocking new devices (check router settings)

Solution: The Ryzer network will reappear after 1-2 minutes. Connect again and try with correct settings.

Security Considerations

Is the “Ryzer” Network Secure?

No - The setup network is intentionally open (no password) for easy configuration. This is only active during initial setup.

After setup:

  • The “Ryzer” network disappears
  • Ryzer joins your home WiFi
  • No external access (local network only)

Should I Worry About Security?

Ryzer operates entirely on your local network:

  • No cloud connection
  • No data sent to external servers
  • Only accessible from devices on your WiFi
  • MQTT connection to printer is local only

Best practices:

  • Use a strong WiFi password
  • Keep Ryzer and printer on trusted home network
  • Don’t expose Ryzer to the internet (no port forwarding)

Next Steps

Now that Ryzer is online:

  1. Connect to Your Bambu Lab Printer - Set up MQTT communication
  2. Configure LED Settings - Adjust LED count and brightness
  3. Check for Firmware Updates - Ensure you have latest features

Need More Help?


Estimated Setup Time: 5-10 minutes Difficulty: Beginner-friendly Requirements: 2.4GHz WiFi network with WPA2 security