A Modular LED System for Bambu Lab 3D Printers
Know your print status at a glance. Green means printing. Red means trouble.
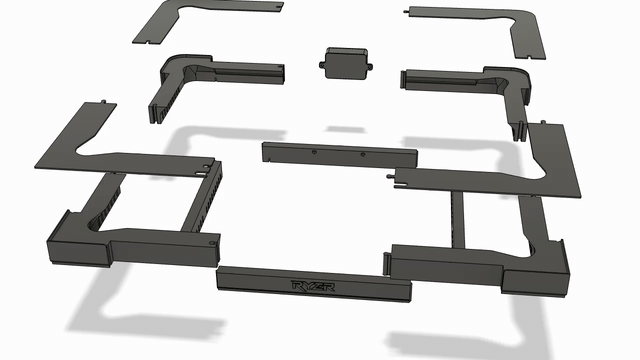
Modular by design. The Ryzer kit snaps together around your Bambu Lab printer — no tools, no wiring diagrams.
How It Works
Three steps from unboxing to glowing.
Download the 3MF file and print the modular mounting bracket on your Bambu Lab printer.
Assemble
Mount the ESP32 controller and LED strip into the bracket. Plug in USB-C for power.
Connect
Join the Ryzer WiFi network, enter your printer credentials, and watch it light up.
LED Status Colors
Each color tells you exactly what your printer is doing — no app needed.
Green — Printing
Your print is running smoothly. Sit back and relax.
Yellow — Leveling
The printer is calibrating and preparing the bed.
Purple — Updating
Ryzer is checking for or applying a firmware update.
Orange — Downloading
New firmware is being downloaded over the air.
Red — Error
Something needs attention. Check your printer.
White — Initializing
Ryzer is booting up and getting ready.
Built for Makers
Everything runs on-device. No cloud. No subscriptions. Just your printer and your network.
WiFi Configuration
Captive portal setup — connect Ryzer to your network without any apps or cables.
Over-the-Air Updates
Update firmware wirelessly from the web dashboard. New features delivered automatically.
Web Dashboard
Manage everything at ryzer.local — LED colors, brightness, MQTT settings, diagnostics.
MQTT Integration
Real-time connection to your Bambu Lab printer for instant status updates.
Ready to Light Up Your Printer?
Follow the setup guide and have Ryzer running in under 15 minutes.
Get Started